Emergency Stop Training: Building a Solid Halt
Picture this: Your dog is off-leash in the park, happily exploring, when suddenly a cyclist rounds the corner at high speed. In that split second, you need your dog to stop dead in their tracks. A standard "come" command won't work here—it might actually put your dog in more danger as they run toward you and directly into the cyclist's path. This is where emergency stop training becomes invaluable.
An emergency stop is fundamentally different from other obedience commands. It's a specialized safety tool designed to freeze your dog's movement instantly, regardless of distance or distraction. Whether you're preventing a dash toward a busy road, stopping a charge toward another dog, or halting a sprint toward a frozen pond, this command could quite literally save your dog's life. [1]
Understanding the Emergency Stop vs. Other Commands
Before diving into training methodology, it's essential to understand what makes an emergency stop distinct from commands like "stay" or a standard recall.
A traditional "stay" command requires your dog to remain in position after you've placed them there, typically with you nearby. An emergency stop, by contrast, works at a distance and often when your dog is moving away from you or not facing your direction. [1] Your dog must interpret a signal from afar and respond immediately by either sitting or lying down, without any physical proximity or prior setup.
Similarly, while a recall asks your dog to come toward you, an emergency stop asks them to pause their current trajectory entirely. This distinction is crucial because in genuine emergencies, calling your dog to you might inadvertently guide them into danger. The emergency stop removes that variable by simply commanding your dog to cease movement and hold position.
Why Emergency Stop Training Matters
The stakes for this particular skill are exceptionally high. Consider these real-world scenarios where an emergency stop could be lifesaving:
- Your dog bolts toward a busy street before you can react
- An aggressive dog approaches while your pup is off-leash
- Your dog spots wildlife and begins to chase
- Your dog heads toward a hazardous area like a frozen pond or cliff edge
- A cyclist, runner, or vehicle approaches unexpectedly
In each scenario, a reliable emergency stop provides you with immediate control, buying precious seconds that could mean the difference between safety and tragedy. [3] Beyond the safety implications, investing time in this command also strengthens the bond between you and your dog, as it demonstrates your dog's willingness to prioritize your guidance even in exciting or tempting situations.
Preparing for Success: Prerequisites and Environment
Like any complex training endeavor, emergency stop training requires proper preparation. Before you begin, consider these foundational elements:
Selecting Your Training Environment
Start in a distraction-free space where your dog can focus entirely on learning. This might be a quiet room in your house, your backyard with minimal stimuli, or a secluded area of a park during off-peak hours. [3] The goal is to eliminate competing stimuli so your dog can form a clear association between your cue and the desired behavior. Once your dog masters the command in this controlled setting, you'll gradually introduce real-world distractions.
Choosing Your Cue and Signal
Your emergency stop cue should be distinctly different from everyday commands. This uniqueness helps your dog understand that this particular signal carries special importance. Many trainers use a sharp hand signal—such as a quick upward arm motion—paired with a verbal cue like "stop" or "halt." [1] The combination of visual and auditory signals increases the likelihood your dog will respond even from a distance or when facing away from you.
Selecting High-Value Rewards
Emergency stop training requires exceptional motivation. Unlike routine obedience training, where standard treats or praise suffice, this command demands rewards that your dog finds absolutely irresistible. Identify treats or toys that make your dog's eyes light up—the kind that surpass their normal daily rewards. [3] These premium reinforcements signal to your dog that responding to this particular cue yields extraordinary payoff.
Step-by-Step Training Protocol
Phase 1: Building Motivation and Introducing the Tool
Many trainers use a specialized training device called "The Clam"—a treat-dispensing tool that's highly visible at distance and can be thrown with accuracy. [1] If you don't have this specific tool, any visible, throwable treat container works similarly.
Begin by building your dog's enthusiasm for the training tool:
- Show your dog the tool with treats visible inside
- Open it and allow your dog to retrieve the treats
- Close it gently and let your dog use their nose to access treats inside
- Use particularly aromatic treats to maximize motivation
- Lure the tool around slowly while your dog follows with their nose
Repeat these steps until your dog demonstrates genuine excitement about the training tool. You'll know you've succeeded when your dog eagerly tracks the tool's movement and shows obvious anticipation.
Phase 2: Introducing the Hand Signal
Now that your dog is motivated, introduce the physical cue:
- Have your dog follow the training tool with their eyes
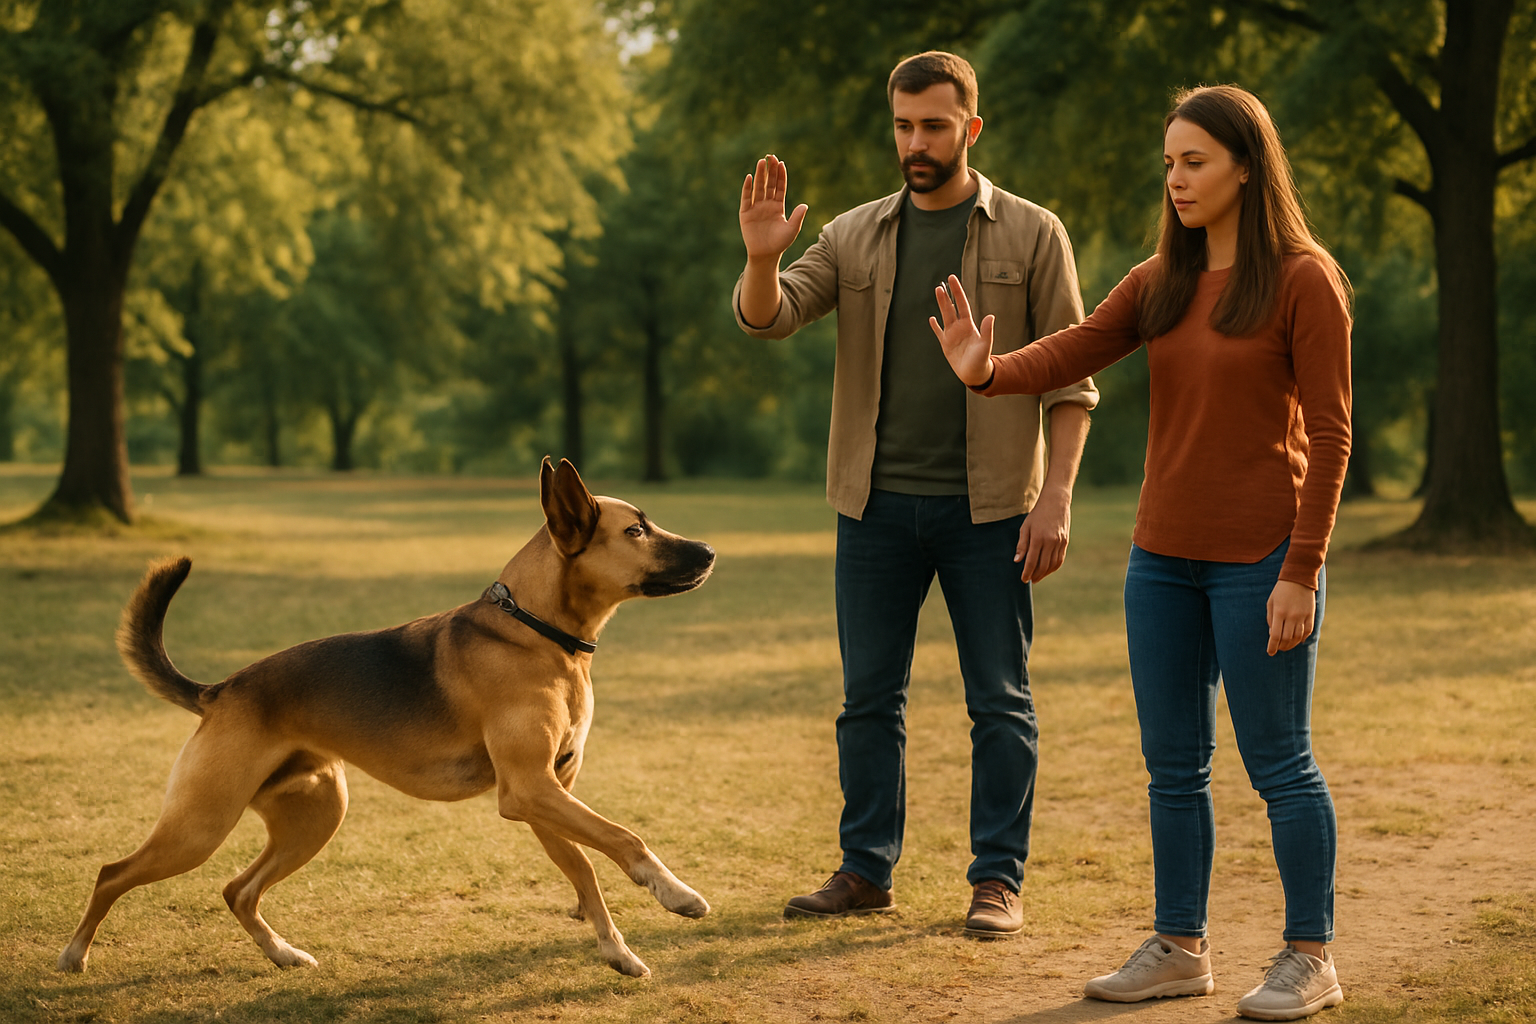
- Suddenly raise your arm upward in a sharp motion
- Watch for your dog's head to follow your arm and their bottom to contact the ground (a sit)
- Immediately drop the training tool at your dog's feet as a reward
- Allow your dog to retrieve and enjoy the treats
This sequence teaches your dog that the upward arm motion predicts the arrival of their reward. Repeat this 5-10 times in your training session. The key is ensuring your dog sits as a result of the signal, not simply out of habit. [1]
Phase 3: Adding Distance and Direction
Once your dog reliably sits when you raise your arm, begin introducing distance and directional variation:
- Pretend to throw the training tool in one direction to divert your dog's attention
- When your dog looks back toward you, raise your arm and give your verbal cue
- When your dog sits, throw the training tool just behind them
- This encourages your dog to retrieve the reward from behind their current position, preventing them from creeping forward in anticipation
Gradually increase the distance between you and your dog during these sessions. Work up to distances of 5-10 meters in your controlled environment before progressing further. [1]
Phase 4: Transitioning to Real-World Environments
Once your dog reliably responds to the emergency stop cue in a distraction-free setting at reasonable distances, it's time to venture into the real world. [3] Start with mildly distracting environments—perhaps a quiet park during off-peak hours—before progressing to busier settings.
During this phase:
- Maintain shorter distances initially (5 meters or less)
- Gradually increase distance as your dog demonstrates reliability
- Introduce mild distractions first (a person nearby, light background noise)
- Progress to more challenging distractions (other dogs at distance, moderate activity)
- Continue using your high-value reward system consistently
Advanced Techniques and Troubleshooting
Building Duration
Initially, your dog needs only to stop momentarily. As training progresses, gradually extend the duration of the hold. After your dog sits in response to your cue, wait 2-3 seconds before delivering the reward. Slowly increase this interval over multiple training sessions. This teaches your dog that maintaining the position—not just achieving it—earns the reward.
Fading the Training Tool
Eventually, you'll want to rely less on the physical training tool and more on the hand signal and verbal cue alone. Begin by occasionally omitting the tool throw while still providing verbal praise and treats from your pocket. Gradually increase the frequency of these tool-free repetitions until your dog responds reliably without it.
If Your Dog Isn't Responding
If progress stalls, consider these troubleshooting strategies:
- Insufficient motivation: Reassess your reward value. Your dog may need even higher-value treats or toys to prioritize the command over environmental stimuli.
- Unclear cue: Ensure your hand signal is sharp and distinct. Some dogs respond better to louder verbal cues or unique sounds like a whistle.
- Premature progression: Return to earlier training phases and rebuild foundation before advancing again.
- Environmental overwhelm: The new environment may be too distracting. Practice in quieter settings before attempting more challenging scenarios.
Safety Considerations and Realistic Expectations
While emergency stop training is invaluable, it's important to maintain realistic expectations and implement additional safety measures. No training is 100% reliable in all situations, particularly when your dog is highly aroused or frightened. [5] Therefore:
- Continue using a leash in potentially dangerous environments (near roads, around unfamiliar dogs)
- Maintain secure fencing in your yard
- Never rely solely on the emergency stop command in life-threatening situations
- View this training as an additional layer of safety, not a complete substitute for physical management
Maintenance and Long-Term Success
Like all trained behaviors, emergency stop reliability depends on consistent practice. Incorporate regular training sessions into your routine—even brief 5-10 minute sessions several times weekly maintain responsiveness. [5] Vary your practice locations and gradually introduce novel distractions to ensure your dog generalizes the command across different contexts.
Additionally, periodically reinforce the command with high-value rewards, even after your dog has mastered it. This prevents the behavior from extinguishing over time and maintains your dog's motivation to respond.
Key Takeaways
Emergency stop training represents one of the most valuable investments you can make in your dog's safety. By understanding how this command differs from standard obedience, preparing your training environment thoughtfully, and following a systematic progression from basic to advanced stages, you can build a reliable halt that functions when it matters most.
Remember that patience and consistency are paramount. This isn't a quick-fix command but rather a carefully constructed safety skill that requires dedication and practice. The effort you invest today could quite literally save your dog's life tomorrow, making every training session worthwhile.
Start in a distraction-free environment, use rewards that genuinely excite your dog, and progress gradually. With time and repetition, your dog will develop the ability to freeze on command—giving you the confidence to allow them greater freedom while maintaining their safety.